Button Tutorial with Arduino and Rhinobot
Introduction
Buttons are fundamental components used in electronics for user interaction. In this tutorial, we will learn about buttons, how to connect them to an Arduino Nano, their placement on the Rhinobot controller board, and how to write an Arduino program to read button states. We will also explore how to control an LED using a button.
Understanding a Button
A button (or push button) is a switch that completes an electrical circuit when pressed. It has two states:
- Pressed (LOW): When the button is pressed, the circuit is closed, and the pin reads LOW.
Released (HIGH): When the button is not pressed, the circuit is open, and the pin reads HIGH (when using an internal pull-up resistor).
Buttons usually have four pins, but only two opposite pins need to be used in a simple circuit.

Connecting a Button to Arduino Nano
To connect a button to an Arduino, follow these steps:
- Connect one side of the button to digital pin 2 on the Arduino.
- Connect the other side of the button to GND.
This configuration ensures that when the button is pressed, the pin reads LOW, and when released, it reads HIGH.

Locating the Button on the Rhinobot Controller Board
The Rhinobot controller board makes it easier to learn Button controls. All the connections have already been done on the board, and all you have to do is learn how to code, making it relatively easier for beginners.
The BUTTON is connected to pin 2 on the controller board, and we can complete the circuit by connecting a jumper cap to the BTN pins.

Arduino Code for Reading a Button
The following code reads the button state and prints it to the Serial Monitor:
void setup() {
// put your setup code here, to run once:
pinMode(2, INPUT_PULLUP);
Serial.begin(9600);
}
void loop() {
// put your main code here, to run repeatedly:
int button = digitalRead(2);
Serial.println(button);
delay(100);
}
- pinMode(2, INPUT_PULLUP) – Sets digital pin 2 as INPUT to receive signals (e.g. from a Button). We use INPUT_PULLUP to stop button from electrical noises, by using an internal resistor.
- Serial.begin(9600) – Initializes serial communication (Arduino communication with your computer) to a baud rate of 9600 (Meaning 9600 bits per second speed).
- digitalRead(2) – Reads button input from pin 2 and assigns it to variable button.
- Serial.println(button) – Prints the reading stored in the variable button and displays it on the Serial Monitor.
- delay(100) – This line again pauses the code execution for 100 milliseconds.
Arduino Code to Control LED using Button
Now, let’s modify the code to turn an LED on when the button is pressed and off when released.

void setup() {
// put your setup code here, to run once:
pinMode(2, INPUT_PULLUP);
pinMode(3, OUTPUT);
Serial.begin(9600);
}
void loop() {
// put your main code here, to run repeatedly:
int button = digitalRead(2);
if (button == 1) {
digitalWrite(3, LOW);
} else {
digitalWrite(3, HIGH);
}
delay(100);
}
- pinMode(3, OUTPUT) – Sets pin 3 to OUTPUT, for LED.
- button – Variable which stores the value of Button, 1 for OFF and 0 for ON.
- digitalWrite(3, LOW) – When button is not pressed, i.e, OFF, then LED is turned OFF.
- digitalWrite(3, HIGH) – When Button is pressed, i.e, ON, then LED is turned ON.
Uploading the Code to Arduino
- Open the Arduino IDE:

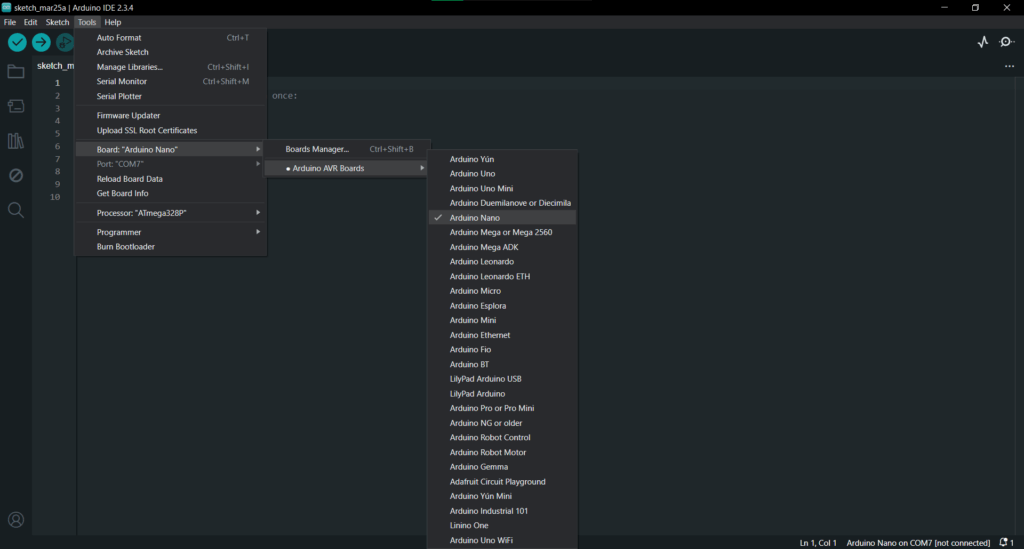
- Connect your Arduino Nano to your computer via USB.Select the correct board: Tools > Board > Arduino Nano.

- Select the correct port: Tools > Port > (your Arduino port).

- Copy and paste the above code into the Arduino IDE.

- Click on the Upload button or alternatively press Ctrl + U.

- Once uploaded, the Button should start reading inputs.

Opening Serial Monitor
Once you upload the program to your Arduino Nano, the input of the Button is shown on the Serial Monitor. Therefore, to open a serial monitor, follow the steps:
- Click on Serial Monitor icon on the top-right corner.

- Select the Baud Rate of the Serial Monitor, which in our case is 9600.

After this steps, you will be able to see the Button presses, 1 for OFF and 0 for ON.
Conclusion
This tutorial covered the basics of using a button with Arduino, including wiring, reading its state, and controlling an LED. Understanding INPUT_PULLUP, digitalRead(), Serial.begin(), and Serial.println() provides a solid foundation for interactive projects.
Experiment further by adding debounce logic or implementing a toggle switch functionality.